

Small outboards rarely get the attention they deserve. Tucked onto the transom of a tender, dinghy, or runabout, they're expected to fire up first pull every time, regardless of how long they've been sitting or how much salt they've been exposed to. That compact little motor faces exactly the same punishment as a high-horsepower engine, and it needs the same basic care to stay reliable. Skip the maintenance, and the consequences tend to show up at the worst possible moment.
Having the right tools makes the whole job easier. Building a solid toolkit before you start means fewer interruptions and fewer shortcuts.
Kicking off the season the right way
Servicing your outboard before the season begins is always time well spent. A few hours in the shed now prevents a frustrating morning on the water later.
For four-stroke motors, start with an oil change. Two-stroke owners should check their fuel-oil mix ratios. Either way, inspect every fuel line for cracking or brittleness, swap out old filters, and drain any fuel that's been sitting since last season. While you're at it, clean the exterior thoroughly, examine the propeller for chips or damage, and confirm the kill-switch lanyard is still functioning correctly.
Motors that sit unused over winter are particularly prone to gummed-up carburettors and varnish deposits from stale fuel. Fresh petrol and quality two-stroke oil where required go a long way toward preventing these problems before they start.
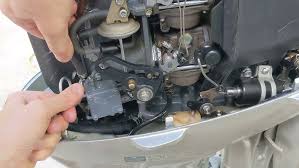
If the engine still doesn't run cleanly after your pre-season preparation, a carburettor clean is the logical next step. It's a straightforward job once you've done it a couple of times, but the first time through, having some professional guidance makes the process much less daunting.
Flushing, greasing, and protecting
Saltwater is the single greatest threat to any outboard motor, regardless of its size. After every outing, even a short run from a beach to a moored vessel, flush the engine thoroughly with fresh water. Use flush muffs or the built-in flushing port, run the motor for a few minutes so the water cycles through properly, then allow it to drain completely before putting it away.
Greasing every accessible moving part is just as important. Tiller joints, steering pivots, the prop shaft, and clamp screws all need attention. Marine-grade grease is essential here. Automotive products won't hold up in a saltwater environment as they wash off quickly, leaving bare metal exposed to the elements. Quality marine greases from ranges such as CRC or Quicksilver are purpose-built for this kind of use.
A few simple habits help here. Wipe away the old grease before applying fresh product. Apply it in light coats and do so regularly rather than in heavy applications infrequently. Before refitting the propeller, always put a small amount of grease on the prop shaft to prevent it from seizing in place.
The prop and lower leg
Even on a small motor, it only takes a moment for fishing line or debris to wrap itself tightly around the propeller shaft. Every few outings, pull the prop off and check carefully for line, corrosion, or physical damage. If the split pin is showing its age, replace it.
While you have the lower leg exposed, check the gear oil. Remove the drain plug and look at the colour of the oil as it comes out. If it appears milky or cloudy, water has found its way into the gearbox, which points to a failing prop-shaft seal. Catching this early matters. Left unaddressed, the resulting corrosion can turn a minor seal replacement into a much more expensive repair.
Sacrificial anodes do real work
Every outboard motor carries at least one sacrificial anode, typically a small block of zinc or aluminium mounted on the lower leg or incorporated into the trim tab. The anode's entire purpose is to corrode in place of the surrounding metal, drawing corrosive attack away from the motor's more critical components.
Check anodes at the start of each season. Replace any anode that has lost more than half its mass, or that is heavily crusted over. Make sure there is clean, direct metal-to-metal contact between the anode and the motor. If there's paint underneath it, the anode can't do its job. Never paint over an anode either, for the same reason. A light application of marine grease on the mounting bolts will make removing the anode much easier at next season's service.
For boats kept in saltwater permanently, checking anodes every few months rather than annually makes sense. The cost of a replacement anode is trivial compared to the cost of corrosion damage to your lower leg or prop housing.
A few more quick checks
Beyond the main items, several smaller checks are worth building into your routine. The spark plug should be replaced annually, or at minimum cleaned with a wire brush and re-gapped. Cables and clamps benefit from a wipe-down with CRC 6-66 or a marine lanolin spray to keep corrosion at bay. If the engine is idling roughly, carburettor cleaner can shift any varnish buildup that's affecting the jets. Before any extended storage period, drain the carburettor float bowl to prevent stale fuel from gumming it up.

Tilting, trimming, and storing properly
The way you store an outboard matters as much as the maintenance you perform on it. Before putting the motor away, tilt it fully down first so any residual water can drain out, then tilt back up and lock it in the raised position for transport or storage. Keep the trim rams retracted when the motor is not in use, and wipe any exposed rod surfaces with marine grease to protect them. Store the outboard upright in a dry, well-ventilated space. Storing on its side is not recommended unless your owner's manual specifically permits it.
For longer storage periods, spraying fogging oil into the cylinders before putting the motor away provides useful protection against internal corrosion while it's sitting idle.
Routine that works for every small motor
| Task | How often | Why it matters |
|---|---|---|
| Flush with fresh water | After every trip | Removes salt and sand |
| Grease moving parts | Monthly | Prevents corrosion and seizing |
| Check spark plug | Each season | Reliable starting and smooth idle |
| Change gear oil | Yearly | Protects internal gears |
| Inspect prop shaft | Every few outings | Clears debris, checks seals |
| Check and replace anodes | Every season / 50% worn | Prevents electrolysis damage |
| Drain carburettor / old fuel | Before winter | Stops clogging and hard starts |
Consistency is the key
The vast majority of small outboard failures trace back to neglect rather than mechanical bad luck. Engines that are flushed regularly, greased consistently, and given a proper look-over at the start of each season simply keep running. Spend a couple of hours on your motor before the season begins, and you're investing in years of trouble-free time on the water.
A tube of marine grease, a spark plug spanner, and a clean rag represent some of the best value maintenance gear you can own. The ocean is a harsh environment, but with a sensible routine in place, your outboard can handle it.